TL;DR — Claude Code hooks are scripts that run automatically at 17 lifecycle points — before/after tools, on session start, when agents spawn. Use them to block dangerous commands, auto-lint files, log every action, and scan for secrets without any prompting. Jump to your first hook →
I’ve been using Claude Code for months before I discovered hooks. Now I can’t imagine working without them. Hooks are scripts that run automatically before or after Claude Code performs an action. They unlock an entire category of workflows that aren’t possible with prompts alone.
Want to automatically lint every file Claude edits? Hook. Want to block dangerous commands without relying on the deny list alone? Hook. Want to log every action Claude takes for audit purposes? Hook. Want to auto-run tests after every code change? Hook.
Here’s everything I’ve learned about building effective hooks, with real examples you can steal. For the full cross-topic map of Claude Code — setup, subagents, plugins, production patterns, and where hooks fit into the larger system — see our complete Claude Code guide.
What Are Claude Code Hooks?
Hooks are handlers that Claude Code executes at specific points in its workflow. They’re configured in .claude/settings.json and run automatically, no prompting required.
Note: When this post was first written, Claude Code had 4 hook events. It now has 17. The system has evolved significantly. It went from a simple pre/post tool mechanism into a full lifecycle event system covering sessions, agents, teams, and infrastructure.
Each hook receives context about the current event. Your handler reads it, does its thing, and signals back whether to continue, block, or provide feedback.
Here’s the complete event table, grouped by lifecycle:
Session Lifecycle
| Hook | When It Runs | Matchers | Can Block? |
|---|---|---|---|
SessionStart | Session begins (startup, resume, clear, compact) | startup, resume, clear, compact | No |
PreCompact | Before context compaction | manual, auto | No |
SessionEnd | Session ends | — | No |
User Interaction
| Hook | When It Runs | Matchers | Can Block? |
|---|---|---|---|
UserPromptSubmit | User submits a prompt | — | Yes |
Notification | Claude sends a notification | permission_prompt, idle_prompt, auth_success, elicitation_dialog | No |
Tool Lifecycle
| Hook | When It Runs | Matchers | Can Block? |
|---|---|---|---|
PreToolUse | Before Claude runs a tool | Tool name (e.g. Bash, Edit) | Yes |
PermissionRequest | Claude requests permission for a tool | Tool name | Yes |
PostToolUse | After a tool succeeds | Tool name | No (feedback) |
PostToolUseFailure | After a tool fails | Tool name | No (feedback) |
Agent Lifecycle
| Hook | When It Runs | Matchers | Can Block? |
|---|---|---|---|
SubagentStart | A subagent spawns | — | No |
SubagentStop | A subagent stops | — | Yes |
Stop | Claude stops a turn | — | Yes |
Team Events
| Hook | When It Runs | Matchers | Can Block? |
|---|---|---|---|
TeammateIdle | A teammate goes idle | — | Yes |
TaskCompleted | A task is completed | — | Yes |
Infrastructure
| Hook | When It Runs | Matchers | Can Block? |
|---|---|---|---|
ConfigChange | Configuration changes | — | Yes (except policy changes) |
WorktreeCreate | A git worktree is created | — | Yes |
WorktreeRemove | A git worktree is removed | — | No |
Each hook receives a JSON payload on stdin with details about the event. Your handler reads it and exits with a status code (for blocking hooks) or returns structured feedback.
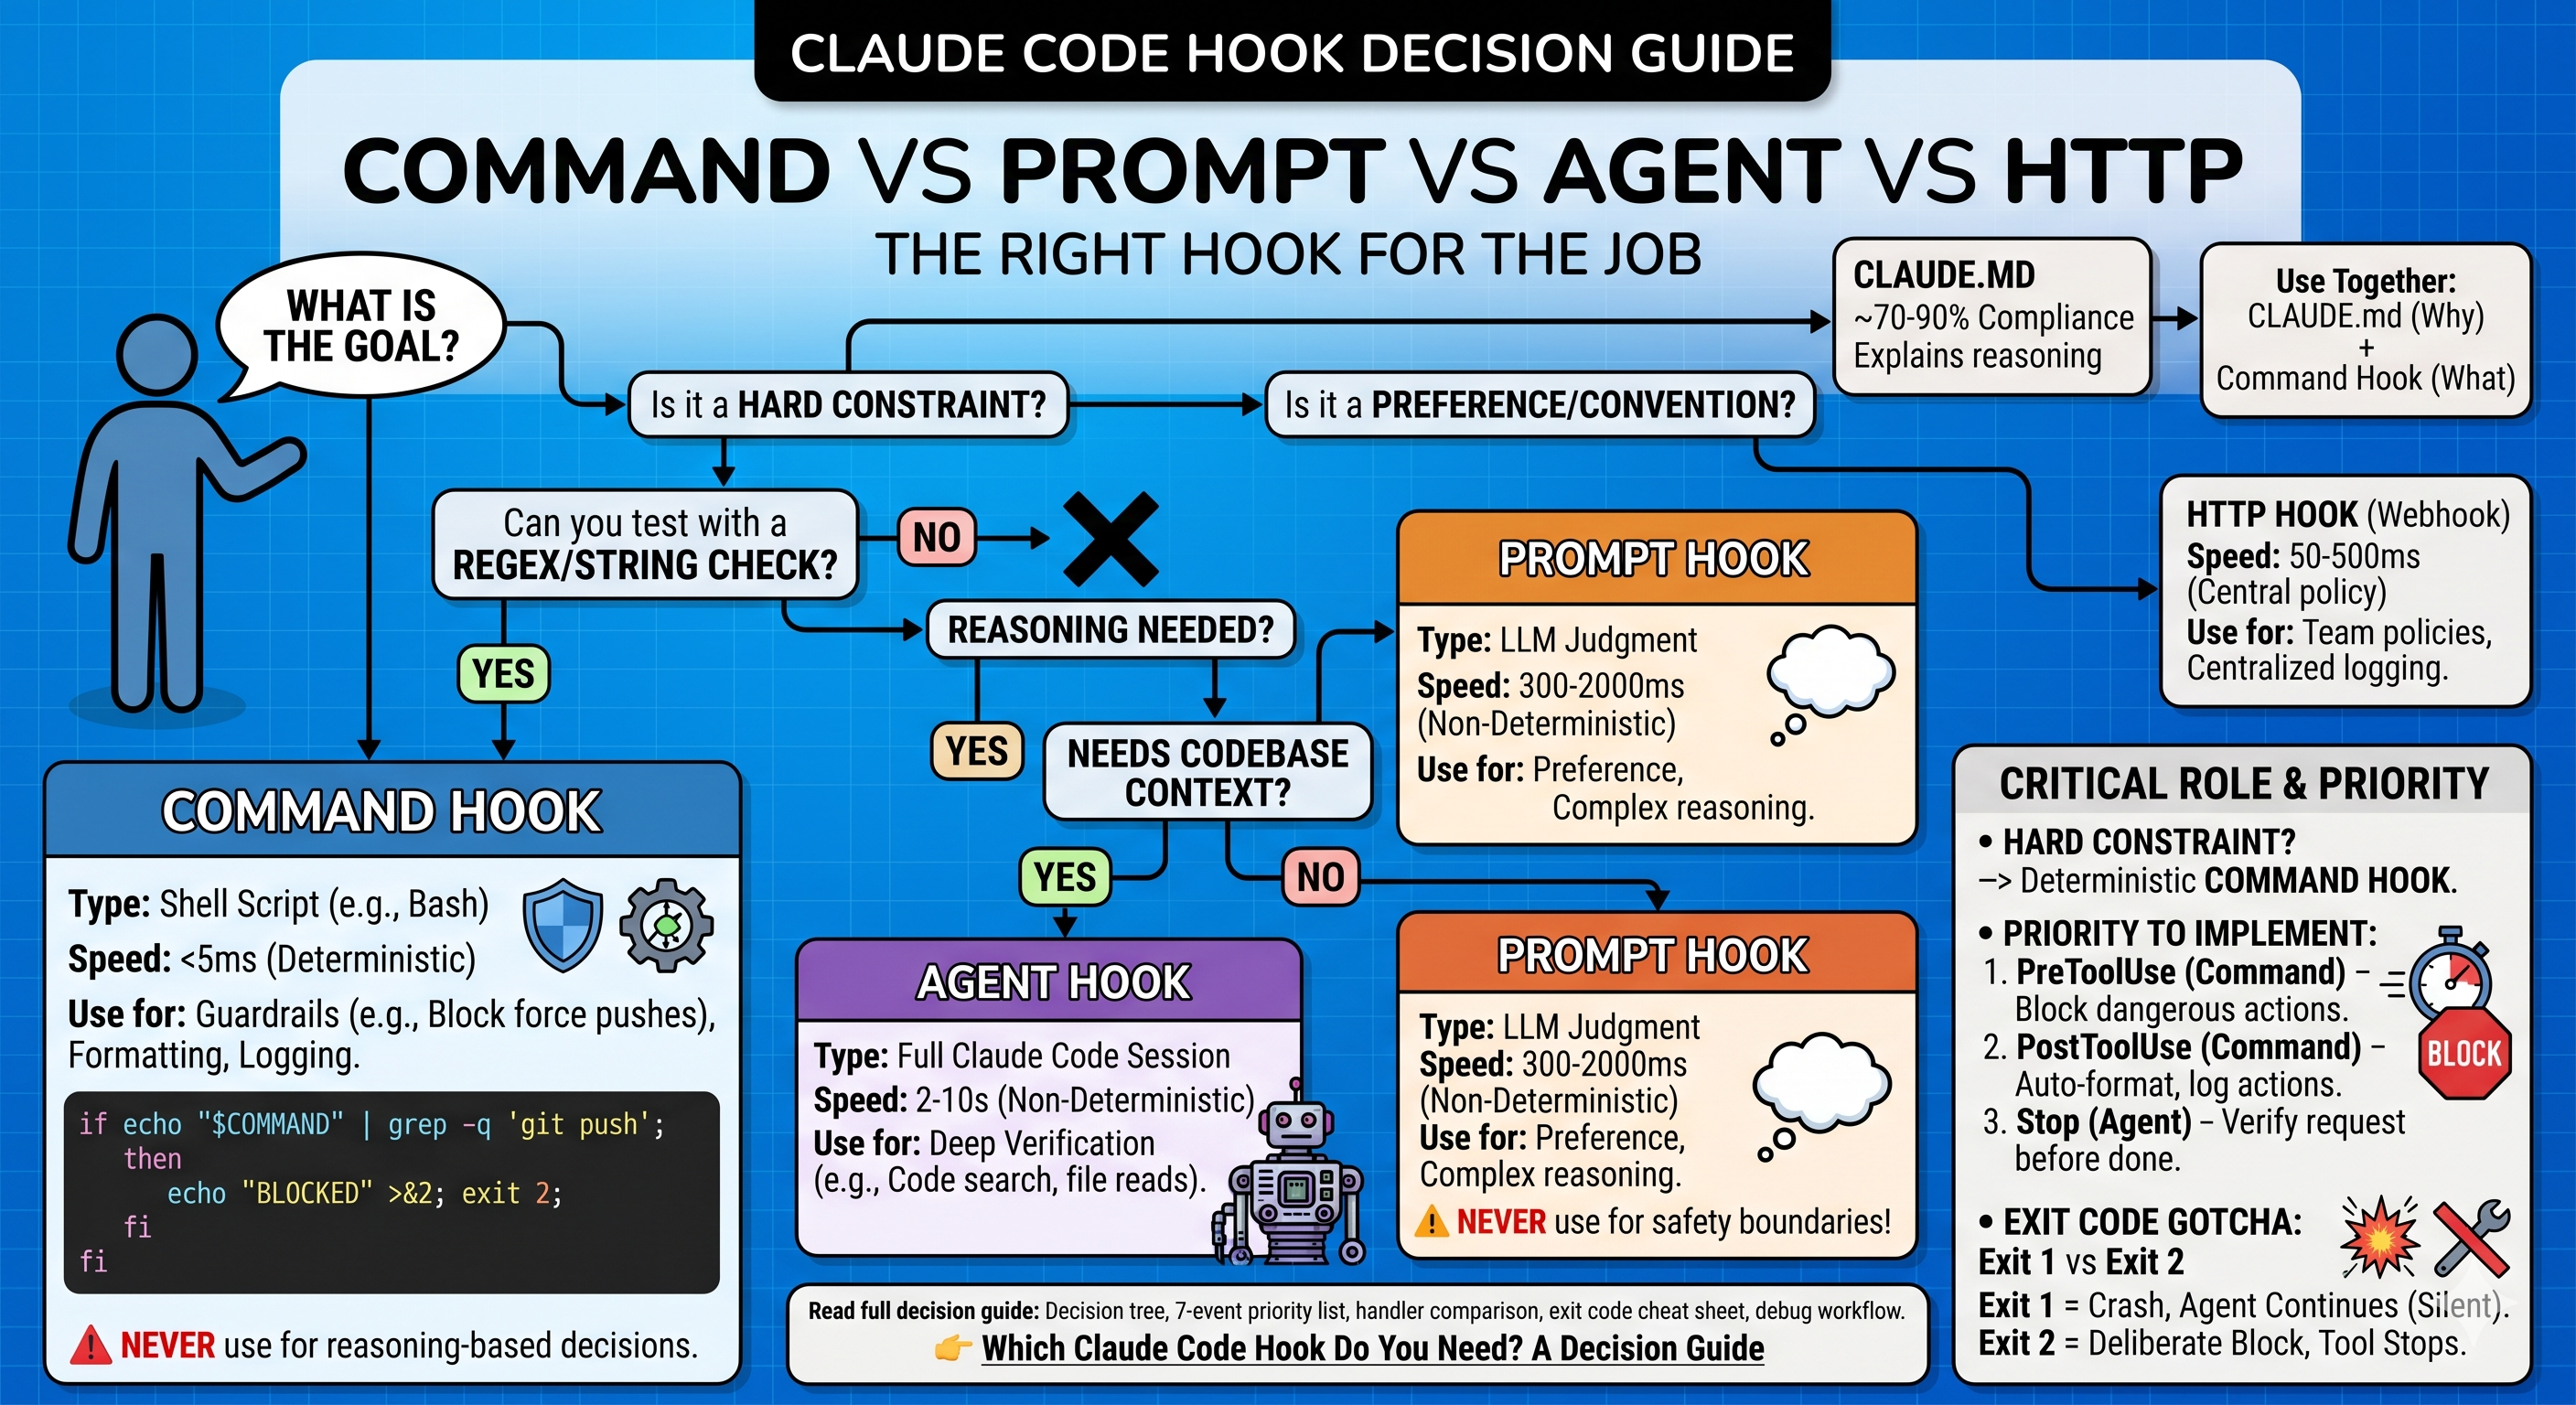
What Are the 4 Handler Types?
This is where Claude Code’s hook system gets interesting. Most tutorials only cover shell scripts, but there are actually 4 handler types, each suited for different jobs.
command — Shell Script
The classic. Receives JSON on stdin, runs your script. This is what all the examples later in this post use.
{ "type": "command", "command": ".claude/hooks/my-script.sh", "timeout": 10}Best for: file operations, custom logic, calling external tools, anything requiring conditional branching.
prompt — AI Yes/No Decision
A single-turn Claude Haiku call that makes a blocking decision. No scripting needed. You write a prompt, it returns {"ok": true} or {"ok": false, "reason": "..."}.
{ "type": "prompt", "prompt": "Check if this shell command is safe to run: $ARGUMENTS. Respond with JSON: {\"ok\": true} if safe, or {\"ok\": false, \"reason\": \"explanation\"} if it looks dangerous.", "model": "claude-haiku-4-5", "timeout": 30}This is powerful for situations where you’d normally write a regex-based script but the logic is actually fuzzy. “Is this command safe?” is a hard problem for a bash script. It’s easy for an LLM.
agent — Multi-Turn AI with File Access
A multi-turn subagent with tools: Read, Grep, Glob. For verification tasks that need to examine your codebase before deciding.
{ "type": "agent", "prompt": "Verify all unit tests still pass before allowing this change. Run the test suite and check the results. $ARGUMENTS", "timeout": 120}Use this when a yes/no answer requires actually looking at files. For example: “Does this database migration have a corresponding rollback?” or “Does the modified API endpoint still match its contract tests?”
http — POST to Webhook URL
POSTs the event JSON to an external URL. For audit pipelines, monitoring dashboards, external approval gates, or any service that needs to know what Claude is doing.
{ "type": "http", "url": "http://localhost:8080/hooks/events", "headers": { "Authorization": "Bearer $MY_TOKEN" }, "allowedEnvVars": ["MY_TOKEN"], "timeout": 30}Note the allowedEnvVars field: you explicitly allowlist which environment variables can be referenced in the config. This prevents accidental credential leakage.
Quick Reference
| Type | Description | Best For |
|---|---|---|
command | Shell script, JSON on stdin | File ops, custom logic, external tools |
prompt | AI yes/no decision (Haiku) | Content validation, safety checks |
agent | Multi-turn AI with file access | Complex verification, test checking |
http | POST to webhook URL | External services, audit, monitoring |
How Do You Build Your First Hook?
Let’s start with the most practical hook: blocking dangerous commands. This is a command-type hook that catches problems before they happen.
Step 1: Create the Hook Script
#!/bin/bashinput=$(cat)tool_name=$(echo "$input" | jq -r '.tool_name // ""')command=$(echo "$input" | jq -r '.tool_input.command // ""')
# Only check Bash commandsif [ "$tool_name" != "Bash" ]; then    exit 0fi
# Block file deletionif echo "$command" | grep -qE '\brm\s+'; then    echo '{"error": "BLOCKED: rm is not allowed. Delete files manually."}' >&2    exit 2fi
# Block force pushif echo "$command" | grep -qE 'git\s+push\s+.*(-f|--force)'; then    echo '{"error": "BLOCKED: Force push is not allowed."}' >&2    exit 2fi
exit 0
Step 2: Make It Executable
chmod +x .claude/hooks/block-dangerous.shStep 3: Register It in Settings
{ "hooks": { "PreToolUse": [ { "matcher": "Bash", "hooks": [ { "type": "command", "command": ".claude/hooks/block-dangerous.sh" } ] } ] }}Now every Bash command Claude tries to run goes through your script first. If it matches a dangerous pattern, the script returns exit code 2 with an error message, and Claude sees the command was blocked.
Try it now: Copy the
block-dangerous.shscript above into.claude/hooks/in your current project, make it executable withchmod +x, and add thePreToolUseregistration to.claude/settings.json. Then ask Claude to runrm testfile.txtand watch it get blocked.
How Do You Auto-Lint After Edits?
This one saves me 5-10 prompts per session. Every time Claude edits a file, the hook automatically runs the linter on that file.
#!/bin/bashinput=$(cat)tool_name=$(echo "$input" | jq -r '.tool_name // ""')file_path=$(echo "$input" | jq -r '.tool_input.file_path // ""')
# Only run after Edit toolif [ "$tool_name" != "Edit" ]; then    exit 0fi
# Get file extensionext="${file_path##*.}"
case "$ext" in    ts|tsx)        npx eslint --fix "$file_path" 2>/dev/null        ;;    py)        python -m black "$file_path" 2>/dev/null        ;;    kt)        ktlint --format "$file_path" 2>/dev/null        ;;esac
exit 0
Register it as a PostToolUse hook:
{ "hooks": { "PostToolUse": [ { "matcher": "Edit", "hooks": [ { "type": "command", "command": ".claude/hooks/auto-lint.sh" } ] } ] }}Now Claude’s edits are automatically formatted. No more “please run prettier” follow-ups.
How Do You Log Every Claude Code Action?
For teams that need to audit AI tool usage, this hook logs every action Claude takes to a file.
#!/bin/bashinput=$(cat)tool_name=$(echo "$input" | jq -r '.tool_name // ""')timestamp=$(date -u +"%Y-%m-%dT%H:%M:%SZ")
# Create log entrylog_entry=$(echo "$input" | jq -c --arg ts "$timestamp" '{    timestamp: $ts,    tool: .tool_name,    input: .tool_input}')
# Append to log fileecho "$log_entry" >> .claude/audit.jsonl
exit 0
Register for all tools:
{ "hooks": { "PreToolUse": [ { "matcher": "", "hooks": [ { "type": "command", "command": ".claude/hooks/audit-log.sh" } ] } ] }}An empty matcher string matches all tools. Every action gets logged with a timestamp, tool name, and input parameters. This is gold for compliance and debugging.
Get weekly Claude Code tips — One practical tip every week. No fluff, no spam. Subscribe to AI Developer Weekly →
How Do You Detect Secrets Before They Get Committed?
This hook scans every file Claude reads or edits for accidentally exposed secrets.
#!/bin/bashinput=$(cat)tool_name=$(echo "$input" | jq -r '.tool_name // ""')
# Check for file operationsfile_path=""if [ "$tool_name" = "Edit" ] || [ "$tool_name" = "Write" ]; then    file_path=$(echo "$input" | jq -r '.tool_input.file_path // ""')fi
if [ -z "$file_path" ] || [ ! -f "$file_path" ]; then    exit 0fi
# Scan for common secret patternsif grep -qE '(AKIA[0-9A-Z]{16}|sk-[a-zA-Z0-9]{20,}|ghp_[a-zA-Z0-9]{36})' "$file_path"; then    echo '{"error": "BLOCKED: Potential secret detected in file. Review before proceeding."}' >&2    exit 2fi
exit 0
This catches AWS access keys, API keys with common prefixes, and GitHub tokens before they get committed.
How Do You Auto-Run Tests After Every Change?
The most powerful workflow hook. It automatically runs relevant tests when Claude modifies source files.
#!/bin/bashinput=$(cat)tool_name=$(echo "$input" | jq -r '.tool_name // ""')
# Only trigger after Editif [ "$tool_name" != "Edit" ]; then    exit 0fi
file_path=$(echo "$input" | jq -r '.tool_input.file_path // ""')
# Map source file to test filetest_file=""if [[ "$file_path" == *".ts" ]]; then    test_file="${file_path%.ts}.test.ts"elif [[ "$file_path" == *".kt" ]]; then    test_file=$(echo "$file_path" | sed 's|/main/|/test/|')    test_file="${test_file%.kt}Test.kt"fi
# Run the test if it existsif [ -n "$test_file" ] && [ -f "$test_file" ]; then    echo "Running tests for: $test_file" >&2    # Run test (don't block on failure — just inform)    if [[ "$file_path" == *".ts" ]]; then        npx jest "$test_file" --silent 2>&1 | tail -5 >&2    elif [[ "$file_path" == *".kt" ]]; then        ./gradlew test --tests "$(basename ${test_file%.kt})" 2>&1 | tail -5 >&2    fifi
exit 0
Note: This runs tests as a side effect but always exits 0, so it doesn’t block Claude’s workflow. It just shows test results in the output so Claude can see if something broke.
How Do You Combine Multiple Hooks?
The real power is combining multiple hooks. Here’s a complete .claude/settings.json hooks section that wires up all the examples above:
{ "hooks": { "PreToolUse": [ { "matcher": "Bash", "hooks": [ { "type": "command", "command": ".claude/hooks/block-dangerous.sh" } ] }, { "matcher": "", "hooks": [ { "type": "command", "command": ".claude/hooks/audit-log.sh" } ] }, { "matcher": "Write", "hooks": [ { "type": "command", "command": ".claude/hooks/secret-scan.sh" } ] } ], "PostToolUse": [ { "matcher": "Edit", "hooks": [ { "type": "command", "command": ".claude/hooks/auto-lint.sh" }, { "type": "command", "command": ".claude/hooks/auto-test.sh" } ] } ] }}The execution order:
- Before any action: Log it
- Before Bash: Check for dangerous commands
- Before Write: Scan for secrets
- After Edit: Auto-lint, then run tests
What Are the Advanced Hook Features?
Matchers
Matchers are regex patterns that filter which events trigger a hook. A few practical examples:
"matcher": "Bash" // Only Bash tool"matcher": "Edit|Write" // Edit or Write"matcher": "mcp__memory__.*" // Any memory MCP tool"matcher": "mcp__.*__write.*" // Any MCP write operation"matcher": "" // Match everything (empty = wildcard)Tool names for MCP servers follow the pattern mcp__{server}__{tool}. Regex matching means you can target entire MCP server categories without listing each tool individually.
Async Hooks
By default, command hooks run synchronously. Claude waits for them. For slow operations (indexing, telemetry, non-blocking background tasks), add "async": true:
{ "type": "command", "command": ".claude/hooks/send-telemetry.sh", "async": true}Claude continues immediately. The hook runs in the background. Only available for command type.
CLAUDE_ENV_FILE
SessionStart hooks have a special superpower: they can inject environment variables for the entire session. If your SessionStart hook writes to the path in $CLAUDE_ENV_FILE, those variables become available to all subsequent hooks and tools.
#!/bin/bash# Runs at session start — inject env vars
if [ -n "$CLAUDE_ENV_FILE" ]; then    echo "PROJECT_ID=$(cat .project-id)" >> "$CLAUDE_ENV_FILE"    echo "DEPLOY_ENV=staging" >> "$CLAUDE_ENV_FILE"fi
This is only available on SessionStart. Other hooks cannot write to CLAUDE_ENV_FILE.
Stop Hook Loop Prevention
If you have a Stop hook that does something, be careful: if the hook itself causes Claude to stop again, you get an infinite loop. Check the stop_hook_active field in the payload to detect this:
#!/bin/bashinput=$(cat)stop_hook_active=$(echo "$input" | jq -r '.stop_hook_active // false')
# Bail if we're already in a stop hook loopif [ "$stop_hook_active" = "true" ]; then    exit 0fi
# ... rest of your stop hook logic
Hook Scoping
Hooks can live at multiple levels, and they all stack:
- User settings (
~/.claude/settings.json): applies to all projects - Project settings (
.claude/settings.json): applies to this project - Local settings (
.claude/settings.local.json): your personal overrides, not committed - Plugin hooks: from installed Claude Code plugins
- Skill/agent YAML frontmatter: hooks declared inside custom agent definitions
All matching hooks at all levels run. More specific matchers win ordering ties.
What Are the Hook Design Principles?
After building a dozen hooks, here are the principles I follow:
1. Hooks should be fast.
PreToolUse hooks run synchronously. Slow hooks make Claude feel laggy. Keep them under 500ms. If you need to run something slow (like a full test suite), do it in PostToolUse and don’t block on the result. Or use "async": true.
2. Use exit codes correctly.
exit 0= success, continue normallyexit 2= block the action (with error message on stderr)- Any other non-zero = error, but don’t block
3. Always handle missing data.
The JSON payload might not have every field. Use jq -r '.field // ""' with defaults, and always check before acting on a value.
4. Don’t modify Claude’s output. Hooks can block actions or add side effects, but they shouldn’t change what Claude produces. That creates confusing debugging situations.
5. Log liberally. Hooks run silently. When something goes wrong, logs are your only window into what happened.
6. Match the handler type to the job.
Use command for deterministic logic. Use prompt when the decision is fuzzy or language-based. Use agent when you need to examine files before deciding. Use http when an external system needs to know.
How Do You Debug Hooks That Aren’t Working?
When a hook isn’t working:
-
Test it standalone: pipe sample JSON into the script manually:
Terminal window echo '{"tool_name":"Bash","tool_input":{"command":"rm file.txt"}}' | .claude/hooks/block-dangerous.shecho $? # Should be 2 -
Check permissions: the script must be executable:
Terminal window ls -la .claude/hooks/ -
Check jq is installed: most hooks depend on it:
Terminal window which jq -
Check the matcher: an empty matcher matches everything, a specific matcher like
"Bash"only matches that tool. -
Check hook scoping: a hook in
~/.claude/settings.jsonapplies everywhere; a hook in.claude/settings.jsononly applies to this project. Make sure you’re editing the right file.
What Are the Key Takeaways?
- Hooks are Claude Code’s extension system. They let you customize behavior without changing prompts.
- 17 events, not 4. The system now covers session lifecycle, user interaction, tool lifecycle, agent lifecycle, team events, and infrastructure. Not just PreToolUse and PostToolUse.
- 4 handler types, not just shell scripts.
commandfor logic,promptfor AI decisions,agentfor file-aware verification,httpfor external systems. - PreToolUse hooks are your security layer. Block dangerous commands, scan for secrets, validate inputs.
- PostToolUse hooks automate tedious follow-ups. Auto-lint, auto-test, auto-format.
- Keep hooks fast and simple. Under 500ms, clear exit codes, handle missing data.
- Combine hooks for defense in depth. Multiple lightweight hooks beat one complex monolith.
Hooks turn Claude Code from a smart coding assistant into a customizable development platform. Once you start building them, you’ll wonder how you worked without them.
For advanced patterns including prompt hooks, agent hooks, and 7 copy-paste recipes, see Beyond Shell Scripts: Advanced Hook Patterns.
What to Read Next
- I Set Up 3 Layers of Defense in Claude Code. It Deleted My File Anyway. — Real-world lesson on why hook configuration details matter more than the number of layers
- How I Protect Sensitive Code While Using Claude Code on Real Projects — Four strategies for using Claude Code without exposing API keys or credentials
- 5 MCP Servers Every Claude Code Developer Should Set Up — Extend Claude Code’s capabilities beyond hooks with external tool connections
The hooks system is covered in depth in Phase 11: Automation & Headless of the Claude Code Mastery course. Phases 1-3 are free.